Showing posts with label how-to. Show all posts

Wednesday, 25 September 2013

MAKEUP SKILLZ: EYESHADOW BLENDING AND CONTOURING

I get asked all the time what my best tips for creating a great eyeshadow look are, and without a doubt, no matter what kind of look you're trying to create, blending and contouring the eye are your best tools. They take some practice to get right, but once you've worked it out, your eyeshadow looks will look more professional, and less like a 10 year old did your makeup (much like mine used to!).

First, let's talk about blending. The trick to blending properly is having the correct tool for the job. I use Real Techniques eye brushes. The shader brush is perfect for applying the colour, then their deluxe crease brush is perfect for all those blending jobs. I got mine at Walmart and they are really, really affordable.

You should start with a crease-free eyeshadow primer, like Urban Decay Primer Potion, or even a gorgeous cream eyeshadow like Maybelline Colour Tattoo. Just make sure whatever you use isn't going to crease up under your shadow. Primer will give you a smooth canvas, and will also provide a base for the colour to stick to.

Using a flat shader brush, be sure to pat the colour onto the lid, instead of sweeping it across the eyelid, to get the best colour payoff from your eyeshadow. We'll go into what kinds of colours to use where in the contouring section later.
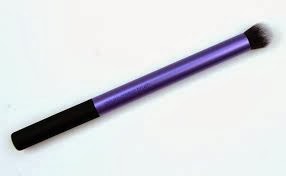
The most important thing I can tell you about blending is to ALWAYS USE A CLEAN BRUSH TO BLEND WITH. I like to keep a makeup wipe on my counter top to clean my blending brush with as I go.
Blend in small, circular motions, taking care to work on top of your shadow, and not into it. Don't press down hard, as the eye area is very delicate, and also the crease/blending brush is designed for just the tips of the fibres to be used to gently blend the eyeshadow together.The finished look should be seamless, with no harsh lines of colour anywhere. The more you blend, the smoother the look, and depending how you want your makeup to end up looking will dictate how much time you need to spend on blending it out. You can always go back in with more colour to even out your look as you blend.

Eye contouring is a really great way to create gorgeous eyeshadow looks that really pop, and the basic eye contour has become a staple of makeup culture today.
We start with the lightest colour we're going to use, highlighting under the brow bone, to give depth to the eyes, and into the inner corner, to make the eyes look slightly larger and set wider apart (if you have large, wide-set eyes, this step will be one you'll like to skip). Next, the main colour you would like to feature in the look goes in  the middle of the eyelid. You can see a really great example of this in the purple look here. I also like to use this colour, or a slightly lighter tone, up into and above the crease, blending it into the brow highlight as a "transition" colour.
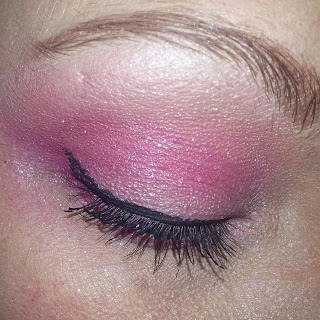
Last of all, for a simple look with eye contouring, use the darkest colour you're going to use, forming a triangular shape into the outer corner of the eye, and sweeping it up and into the crease, once again to add depth to the eyes and make them pop a little more.

Once you're done with the upper lid, depending on your look, you can also use an eyeliner brush (I prefer to use an angled push liner brush for more precise placement) to place some of your eyeshadow colour along the lower lashline. This is particularly nice if you're going for a nice smoked-out look.

Apply eyeliner and mascara as you wish, and your eyeshadow look is done!

A couple more tips now, to deal with fallout (powder falling from the brush as you use it, onto your cheeks).
If you're using really powdery shadows that do fallout a lot, start with your eye makeup, then do a cleanup with makeup wipes and apply the rest of your face. This isn't hard to do, and once you've tried it a couple of times, you'll find it easy.

Alternately, if we're just dealing with a tiny bit of fallout, use a large, soft brush to gently brush the powder away, being careful not to streak it all over your face. If you do happen to make a mess of it, you can always use makeup remover wipes to clean up and simply reapply makeup over the area.

Practice, practice, practice! It's only makeup! It washes off. If you mess it up you can try again. That's one of my best things about makeup, and why I love it so much. You can do anything you want to do, create anything you want to create, and at the end of the day, the canvas is clean to start again!

Monday, 4 February 2013

Monday how-to: Five minute makeup

I know that I usually post my YouTube content on Saturdays, and you'll be getting another video on Saturday, but the only way to show you how to do your makeup in 5 minutes is to actually show you.

So here is today's how-to: 5 minute makeup, for when you literally only have 5 minutes to get ready and out the door.

Monday, 21 January 2013

Monday how-to: making your acrylics look better for longer between fills.

Looks great, right? It's been 4 weeks since I had them filled.
Maybe you're on a budget, or maybe you are like me and extremely time-poor (getting an appointment when I don't have the kids is a nightmare), but sometimes, you have to go a little bit longer between refills of your acrylic nails. Usually, this results in really horrible-looking hands with gross, bumpy nails that look terrible.

Because I'm quite resourceful, I've found several little tips and tricks along the way that help me to keep my acrylics looking wearable until I can get to the salon.


So, the first thing you need to do is file them down. When they get long and overgrown, they are hard to deal with and they break more easily. You're going to need a loose grit file (80 or 100 grit) and a fine (240 grit or higher) file. Start with the rough file and run it up the sides of the nail to straighten it up and remove any rough edges, then across the top of the nail to remove as much of the length as you wish. then, using the fine file, smooth down the edges and slightly round the top corners.

Still using the fine file, and with minimal pressure, start to run the file back and forth across the nail over the ridge where the acrylic starts (about halfway up the nail, if you're 4 week out, like I am). BE CAREFUL. If you apply a lot of pressure, you'll notice the area get red and hot to the touch and that is called file burn.The red mark will stay, and if you apply new acrylic over a file burn, you'll have to grow the red mark out. If it starts to get red or hot, take a break.

You want to file them until the ridge looks more like a natural curve down to the natural nail. Be sure to nourish your nails with something awesome like OPI's Nail Envy.

They should then look like this:

You can see that they look a little worse for wear, but the shape of the nails is more natural and they'll be easy to paint over.

If you can live with the slight curve up from natural to acrylic nail, you can just use a normal nail polish over the top as you normally would. 2 coats, don't forget the top coat, and you're all done.

I like to keep mine looking like I get them filled every week (because, after all, I am a beauty blogger and one must keep up appearances), so I have a new product to show you that fills in the gaps and makes them look awesome.

It's BYS 3D nail art polish, and I'll tell you lots more about it in my review on Thursday, but in the meantime, let's have a look at the result:
The mosaic look is really hot right now, so you'll be right on trend. The only downside is that you'll need some patience, because to get this polish to look like I have, you need 4 coats (plus top coat), so there's a lot of drying time involved. Do it when you're watching a movie.


So that's it. That's how I make my nails look just-filled even when I'm really slack or lacking in time. I wouldn't recommend leaving them for longer than 4 weeks. By that point, you'll need to soak off and start again when you do go to the salon, so it's a waste if they've only been on for a month. I'm actually considering growing mine right off, so I'll update you with how that goes, and how my natural nails fare when they have to face the elements alone.

Monday, 14 January 2013

Monday how-to: Doctoring pictures.

Oh yes, I'm going to go there. Most bloggers do it, but won't tell you why, or how to do it yourself.
I mostly use post-production for my Youtube thumbnails, and I do everything from changes in lighting, to airbrushing, to darkening up my mascara and whitening my teeth. Why? Because I'm vain, why else? Look deep down inside yourself and I'm certain that -most- of the population would do it too, for the same reason.

So...how do I do it? Well, I use an online tool, and I use Photoshop CS3 (outdated, I know, but I really like it and the newer ones just aren't the same). www.picmonkey.com is the online tool that I use for all of my image effects, because it has everything I need in one place, doesn't require me to post the finished pic anywhere online, and to use all of the "Royale" effects, it only costs me $5 per month (there is a free version that has less tools). Photoshop I mainly use to add text to the image once I'm done in picmonkey. I have a tonne of fonts on my computer, and there's always one to suit every image.

Let's have a look at a before and after, just to illustrate what the tools are capable of:

 This is the thumbnail image for my last video tutorial. The thing about YouTube thumbnails is that you're looking to present as professional a look as possible, to make people think that your videos are worth watching before they ever click on it. I know it's working because the view count on this video is way up on all of my others (at least double the next best one).
So the original image is ok, it's a little dark, perhaps, and the product I'm promoting doesn't stand out as well as I'd like it to.
In picmonkey, I adjusted the lighting, bringing the highlights way up to make the brush stand out. Then I airbrushed my face, darkened my lips, cheeks and lashes, and brightened my eyes. I also used the "hair highlights" tool to add a tiny bit of volume to my hair.
Once that was done, I took the image over to photoshop and added the text in the top right corner.

I think you'll agree that it makes for a much more professional finish. People looking to others to teach them about beauty and cosmetics are looking for someone who looks flawless, and it definitely helps if the thumbnail or opening image is a damn good one.

On the side, I have an amateur photography thing going, and I use picmonkey a lot to improve lighting on my finished images. For glamour photography, the airbrush feature comes in really handy. There is even a "wrinkle remover"!

So as "controversial" as image doctoring is, I do believe in honesty above all else, so I decided to share it with you guys, because maybe some of you will get some use out of it too!

Monday, 17 December 2012

How-to: Deal with an allergic reaction.

One thing that lots of us deal with at one time or another is allergic reactions to beauty products.

I experienced this myself for the first time on Wednesday night when I tried out a new cleanser and a wrinkle cream. Immediately after I'd applied it, my skin felt hot and started to sweat, I became very red, and broke out in a lumpy, bumpy rash.

So... when this happens to you, what should you do?


  • Don't panic. You're probably not going to die.
  • Don't put any other products on the affected area. Instead, just cleanse the area with clean, cool water.
  • If you have a cold pack handy, apply it to the affected area to cool down the skin.
  • Leave your skin alone for a couple of days and let it settle down by itself.
  • You could also take an antihistimine if you have some handy.
  • Don't blame the product. In my case, for example, my skin is used to having organic or naturally derived products used on it every day, and this product (s) was a heavy cosmeceutical. My skin basically just went "WHAT THE HELL?" and reacted in a violent manner.
I'm feeling much better now. My skin has settled down, and I'm back on the road to clear skin...and I'm being a little more gentle and cautious.

Monday, 10 December 2012

Monday How-to: Hair Diamonds

Shine bright like a diamond! I have always loved having sparkly things to put in my hair. I think it comes from so many years on the stage, under those awesome lights, my sparkly hair accessories catching the light and giving me a sparkly glow.

So when the amazing people at hair chalk sent me some of their iron-in hair diamonds to try, I was so stoked!

For my video tutorial, look here: http://www.youtube.com/watch?v=RL9vVbW4AUM&feature=plcp

Here's how they work:

The diamonds come on a sheet, which you can cut to get the amount of diamonds you want in the shape you want. You can place them one at a time, as pictured above, or cut a strip or shape for your hair.

Leave them attached to the clear plastic and place them where you want them. They'll stick to where you put them, so do it carefully.

To set the glue, clamp the diamond for a few seconds with your hot iron (straightener). Please note that for strips or shapes, you need to clamp each diamond individually, don't run the straightener down the line of diamonds. Once you've clamped them, remove the plastic sheet.

And that is it! They will last up to a week, unless you want to remove them, which you can do using alcohol (I used hand sanitizer and they came out really easily).

Available from www.hairchalk.com.au go grab some for yourself! They are really affordable and the shipping is fast and free! Tell them Katy sent you!

This product was provided to me by the amazing people at hair chalk. As always, my opinions are my own. Images from www.hairchalk.com.au

Monday, 19 November 2012

Monday How-to: applying false lashes.

I struggled for a really long time with how to apply false lashes, and then I learned the one tip that turned it all around for me. I hope that my step-by-step will help some of you guys achieve massive-lashed looks.

First, you want to be sure that your lashes are clean. The rim (where you put the glue) should be free of any old glue or makeup. The awesome thing about eyelash glue is that you can pull it off with your fingers when it's dry.

Once you have your lovely clean lashes ready to go, you'll need to apply a coat of glue to the rim. Make sure you apply it evenly all the way across the lash, and be sure to use plenty of glue. You want a good sticky edge to work with.

HERE IS THE MOST IMPORTANT PART: Let the glue dry for just a moment. You can blow on it to help it dry faster, or just set the lash upside down on the counter while you put glue on the other lash, but you want it to be nice and tacky when you apply it to your eye.

Now we're ready to apply the lash to your eye. You can hold it with your hands, or a pair of tweezers, whatever suits you better. Start in the middle of the eye and press the lash down as close to the root of the natural lashes as possible. Work your way along the lashline until you have it stuck down all the way across, then apply gentle pressure to the entire lash just for an extra bit of "stay there, you bugger".

Complete the look with the other lash, and there you have it!

I always do my eyeshadow, then line my eyes with pencil (waterline and tightline), then wait for top liner until I have the lashes on, and use my mascara to blend the natural and false lashes together.

That's it! They really are easy once you get the hang of them, and they add a bit of oomph to any makeup look.

Monday, 5 November 2012

How-to Monday: Avoid a heat-induced face-melt.

We all know the feeling. It's a hot day, we've spent ages applying makeup only to have it melt all over our faces in the middle of a party/the races/dancing at the club.

This picture ----------------------> is how that makes me feel.

So, how can we avoid this particular mishap? Well, if you want to keep using the same products that have melted in the past...I can't help you. However, I can suggest some alternatives to get you through the upcoming (Australian) summer months.

First, if you've been taking care of your skin all through winter like I have, this is the time that really pays off. I find during the summer, if I've been really good with my skin care routine, and drinking lots of water, I can get away with a tinted moisturiser or BB cream for foundation makeup. As an alternative that won't melt off, try mineral powder foundation. It will give you a bit more coverage and still allow your skin to breathe.

To avoid panda-eyes caused by sweat/heated up eyeliner and mascara, use a good waterproof eyeliner and mascara. Apart from that, you can use your usual glosses, blush, bronzer, eyeshadow, etc.

Don't forget to use a sunscreen on your face (Dermalogica have an awesome tinted sunscreen which I use as a base in summer) to avoid sun damage. The sun's rays are so strong, even a few minutes out in the sunshine is enough to start burning my English skin.

Moisturise, moisturise, moisturise, and keep drinking lots of water to keep your insides healthy. It will show on the outside, I promise.

Monday, 29 October 2012

Monday How-to: Choosing the right mascara for you.

There are so many different kinds of mascara out there. Definining, Curling, Plumping, Extending, the list goes on and on. So how do you choose which kind of mascara is best for you? Basically, it's all to do with personal preference, rather than face shape, colouring or eye shape, so I'm going to show you some of my favourite mascaras that have a home in my makeup kit, and come out to play dependent on my mood or the occasion.

First, a really great everyday mascara. Australis Lash TLC curling mascara is a really great one to use if you're out and about during the day, just hanging out. The effect is quite nice, it lifts and defines the lash, curling it gently and of course tinting it (mine is black). The other great thing about Lash TLC is that it contains conditioners to look after your lashes while you're wearing it, which is another reason I like it as a day-to day mascara. You may recognize this product from the September bellabox blog post. I love it when a sample becomes a staple.

Innoxa Ultimate Lash mascara is going to be my awesome beach mascara this summer. It's water-resistant (so a splash of water won't make it run, but it cleans off easily when you wash your face), lash curling and plumping, and you can build it up for a more dramatic look with two or more coats, so it easily becomes a beach-to-dinner-date product with a simple extra application. This product was provided for review by the lovely people at Innoxa. My opinions, of course, are always my own.

 Then we have Natio Lash Definition mascara, which really lives up to its name. It separates my lashes perfectly, adding a lovely black tint, while lengthening my lashes just enough for daytime, worktime, anytime wear. This product was provided for review by the lovely people at Natio. My opinions, of course, are always my own.

Maybelline Colossal Volum' Express is a product that has had a home in my makeup kit for a really long time. I always find that when I run out or it starts to get old, I really want to replace it and always have it in my case. It gives the fattest lashes ever, which is awesome for night time going out wear. It also makes a really good foundation for false lashes, creating a really dense look underneath them.

Last of all, we have my very favourite ever mascara. Another one from Maybelline, it's a two-step formula called XXL Extensions. First the primer goes on to create a longer, fatter lash, then once you give that a minute to dry, you go in with the black tope coat and finish the look. Twice in my life I've been asked by heterosexual men if my eyelashes were real or "fake", and both times I was wearing this mascara. It's a winner for any special occasion.

Pro-tip for mascara: Your lashes are cylindrical, so make sure you swoop in from above the lash as well as underneath to ensure maximum coverage and effect.


Monday, 22 October 2012

Monday How-To: loose, flowing curls.....with a straightening tool.


I bought a new straightener on the weekend, and realized I hadn't shown you guys any of my hardware, or how to use it, so I'll show you over the next few weeks how to use different pieces of equipment or how to achieve certain looks using your straightener, curling wand, hair dryer, etc.

First up, how to create soft, loose curls with your straightening tool.

Begin with your straightener nice and hot, and all the tangles combed out of your hair.

Take your hair and pin up the top 2/3 of it (you might want to do 3/4 if your hair is thick). Start work at the bottom of your hair, taking small sections, approximately an inch wide.

Clamp the section in your straightener as if you were going to straighten it, then turn the whole straightener over, so that the hair is wrapped around it. I always flip mine up, but the same result can be achieved by flipping it under, the curl just runs in the opposite direction. Pull the straightener through your hair, keeping it's "flipped up" position all the way down the hair section, and voila! A lovely little curl!

Continue all through the lower section, then let down another 1/3 of your hair and style that in the same way. Pay attention to the back of your hair, you want to look just as good from the back as you do from the front!

Work through the sections and curl all of your hair, then all that's left to do is just to add some argan oil to your fingertips and run your fingers through the curls.. Done!


Let me know what hardware/styling how-to you want to see next!

Monday, 8 October 2012

Monday How-to: Back to basics: Eyes.


 So what's this eye makeup business all about? I keep throwing makeup terms at you guys, but haven't taken the time to explain to you exactly what I'm talking about when I say "lashline", "waterline", or "tightline", or how to blend eyeshadows and layer them to create makeup looks.

Monday, 24 September 2012

Monday How-to: Help your skin recover from a huge night out

All dolled up and ready to go out, I've applied a double layer of foundation and half the eyeliner in the free world, and I'm ready to go.

Skip forward to 3am, I'm exhausted from dancing and socializing, my skin is dehydrated from drinking alcohol and staying in the air conditioned environment. I even skipped out to the smokers' area to talk to friends a couple of times. I fall into bed, don't even remember to take all of that makeup off or take a drink of water and wake up several hours later feeling.... not my best.

Worse that that, my skin is not feeling it's best, either, and it won't until I've taken care of it for a few days.

So how do I undo the damage that I've done? We've all done it on occasion, and TLC is required to bring your skin back under control and have it loving you again.

First, you need to go and drink a big glass of water...and do that again about 10 times during the day for a couple of days. That will help the queasy, not-quite-well feelings too. Also, you should cut back on greasy, sugary foods and keep your intake to really "clean" foods. Lean meats, vegetables, fruits. A bit of a detox, if you like.

Then, you need to go get rid of that nasty makeup that's smeared across your face (you may also want to change your pillow case...). Get rid of the majority with makeup wipes, then get into the shower and give it a really good scrub and cleanse. Biore have an awesome range of products for this, and I'm currently using their daily detoxifying scrub and 4 in one foam cleanser in the shower.
Make sure your face is sparkling clean, then hop out and do a little more work. You can use a face mask if you want to. I like BYS' tea tree mask.

After that's all washed off, you need to tone and moisturise. and an hour later, moisturise again.

Use a night cream, if you don't already.

Rinse and repeat until your skin recovers completely.

Lots of lip balm is important, too.

So, that's how to help your skin recover from a big night out! When was your last big night? Did you have fun?


Monday, 17 September 2012

How-to Mondays: Line those pretty eyes!


This week's How-to Monday is by request from our lovely facebook friend Fay. I asked what you guys wanted to see, and made some suggestions, and she suggested that I look at the differences between pencil, gel pot/brush and liquid liner. What a fantastic idea! Thank you, Fay!

So in my first pic collage here, you can see that I've swatched the 3 different kinds of liner. The top one is a Face of Australia liquid liner that I got from Gloss, I think. It's a product I've used almost daily for months and months and it's still going strong. The two best things about using liquid liner, in my opinion, are that the product lasts for so long, you generally need to throw it away before you finish it because it's been months and it's time for a fresh one, and the precision you get with a liquid liner... but I'll go into that in a minute.

Next on the swatch is Rimmel gel liner, which I actually bought last night from Chemist Warehouse in preparation for this blog post. This gel liner has its own brush built into the pot, which is awesome. The greatest thing about gel liner is its staying power. Gel generally outlasts both pencil and liquid by a long shot, so once you've got it on there, you don't have to worry about it moving during the day/night.

At the bottom of the swatch is my trusty BYS pencil liner, which I also got from Gloss. Pencil liners are a little more forgiving, more versatile, and easier to use in waterlines. The best thing about pencil liners is the lack of mess. You have to sharpen them, but that is the only mess they make, and it can't happen by accident.

As you can see, I've chosen the black version of all three liners, because it's easy to see on pictures, and because black is the most common colour of liner used and available.

So, let's see what each of these look like on my face, and have a look at how they are different.

In the first picture, I've used the BYS pencil liner on my waterline, lower lash line, upper waterline (tightline) and upper lid. You will notice that it's almost a smoky look, because the pencil liner doesn't have that hard, precise line that many people prefer. I really like pencil liner for when I'm doing makeup looks with "bedroom eyes" or goth-y, emo type looks. The coverage is just wider and smokier.

In the second picture, I've applied the gel liner to my lower lashline and upper lid. I don't like to tightline or use gel or liquid liner on my waterlines, because it has a tendency to "bleed" into the eye and cause some irritation. Perhaps I'm not quite getting it right, but I've tried many different techniques, and as soon as I get anything softer than a pencil near the waterlines, that is what happens. With a gel, you get a more precise application than the pencil, and with this built-in brush, the line is quite wide. I really think this gel liner would be great for 60's bombshell looks, looks with wide winged liner, or costume makeup, given its staying power and general wearability.

Last, but not least, I've used the Liquid liner, again on my lower lashline and upper lid. Liquid gives the most precise application, thanks to it's tiny thin, long brush. I love liquid liner for my "classic" looks, and it's so versatile. You can wear just a fine line for a more natural look, or build it up into cat or winged eyes, big fat lines, or even costume makeup where additional face painting is required away from the eyes.

Everyday eyes.
My personal preference, and what I use every day is a combination. Generally, I use pencil liner on my lower lashline, waterline and tightline, then either a liquid or a gel liner on my upper lashline/lid over my eyeshadow. I'll usually apply the pencil first, then eyeshadow, then gel or liquid liner. That's just the way that I do it and I'm sure everyone has different ways to do it.

At some point soon, I'll pop a little tutorial for all three of these on the youtube channel, and I'll post it as extra content for you to have a look at.

See you on Thursday for my review of my awesome Australis Rush Hour palette!

Wednesday, 5 September 2012

How-to: Nail art (video)

I've just uploaded my first tutorial to youtube! Usually, I'd cue the post up for a regular blog day, then show you all, but i just couldn't wait!

Let me know what you think of it, and whether you'd like to see more of these kinds of tutorials set to music just showing you what I do.

Here it is:

http://www.youtube.com/watch?v=65yk6ezYHns&feature=youtu.be