This week's pamper session is brought to you by Lonvitalite, whose story I tell you in the video below, as well as a quick show and tell on their products!
Showing posts with label beauty. Show all posts
Showing posts with label beauty. Show all posts
Wednesday, 30 October 2013

Monday, 28 October 2013
MAKEUP YOUR EYE COLOUR.

All of these pictures are my eyes, which are naturally green (and untouched in the purple makeup pic), but for the purposes of the makeup looks, I've retouched the eye colour in the gold/blue eyes and green/brown eyes pictures.

For blue eyes, gold or bronze colours are best. You always want to look opposite on the colour wheel for the colours that will compliment your eye colour.
For brown eyes, your best bet is green shades.

 Depending on whether you have a warmer shade or a cooler shade of brown, you can push it into teal shades, or more yellowish shades.
Brown can also work well with golden tones, also depending on the individual tone of your eye colour.
 Last of all, green eyes. For me, this is something I've had the opportunity to experiment with a lot, because my eyes are naturally green, with grey and blue tint, depending on my mood or what makeup I wear.

I hope this post has been helpful for you guys. If you have questions, pop me a comment down below and I'll try to answer it for you.
Sunday, 27 October 2013
WEIRD JAPANESE BEAUTY PRODUCTS! DAISO HAUL.

So much awesome stuff was found, and here are some of the beauty finds we came up with!
Monday, 21 October 2013
MAKEUP: AN ACT OF BETRAYAL...?

So, here you can see the difference between my eyes au naturale, and with makeup, lots of eyeliner and mascara, and a very fine pair of false lashes.
 I've also defined my brows in the makeup shots, which does a lot for framing the eyes and completing the look.
 I'm able to mask the large scar I have on the outer corner of one eye with makeup, cover up any imperfections, lengthen my lashes and define the inner rims of my eyes to make them look slightly smaller, yet wider-set (by using a very light colour in the inner corner.
The brow bone is highlighted in white, giving extra dimension to the area, and the crease of the eyelid is darkened to create artificial depth.
This post was inspired by an article I read, which claimed that makeup was deceitful, an act of betrayal.

What do you think?

Sunday, 20 October 2013
TUTORIAL: MODELS PREFER SWEET KISSES TIN
 This week, I had a little play with my new palette from Models Prefer, which I showed you guys the other day. Here is my first makeup look from the palette:
Thursday, 17 October 2013
OMG AMAZING! MODELS PREFER SWEET KISSES PALETTE TIN REVIEW/FIRST LOOK!

This week, I've picked up the most awesome palette I've ever owned, and I didn't even have to save up my pennies for it!
Models Prefer have launched a brand new set called Sweet Kisses, which comes in an absolutely gorgeous "chocolate tin" packaging, and has all sorts of really cute, sweet-themed names.
The tin contains 16 eyeshadows, 2 blushes, bronzer and illuminator, eyeshadow primer, brow gel, mascara and a dual-ended eyeshadow brush.
I'll go through the individual products and let you know my first impressions of them

 First, the actual tin. It's very pretty, lightweight, yet sturdy enough to be a really great packaging that you can count on not to break, and the lid is hinged, which means that you never have to search for the different parts of the tin when you're done with your makeup look.
Next, the primer, which reminds me a lot of Too Faced shadow insurance. The formula is creamy and not greasy, and seems like a really great primer for use to ensure your shadow doesn't move or crease during the day.

 The 2 shades of blush are awesome for pretty much any skintone, and considering the fact that you can mix them together, I think there's something for any cheek there, if you get creative with the bronzer and illuminator also.
Next, we have the duo eyeshadow brush, which is very dense, a flat shader on one end, and a crease brush on the other. They feel good, not as soft as I generally like, but sometimes that's good to help to pack the colour on when you're doing a really awesome eyeshadow look. I'm yet to use it on my actual eye, so I'll let you guys know how I go with that.

There is a clear brow gel, which has a pretty standard traditional spooly brush, which always comes in handy, and a black volumising mascara, with a thinner plastic (spiky-looking) brush, the kind that are popular at the moment. Once I've done a look from this palette, I'll let you know my thoughts on the mascara. It's difficult to judge it without giving it a really good go.


 The actual inner packaging is lightweight foam board, which gives a nicer look than just thin plastic or cardboard, but allows for depotting very easily.
Last of all, here are some shots of the eyeshadows up close, so that you can see the kinds of colours that are included. I think the range is fantastic, and I can't wait to use them to create some really great looks for you guys.
Well done, Models Prefer! I'm really impressed with this tin, and can't wait to see what's next from the brand.
This tin is available from Priceline and Priceline Pharmacy (I got mine from their online store) for $25! Go get one!


Wednesday, 16 October 2013
REVIEW: MODELS PREFER BEAUTY TO GO CREAM AND COMPACT BLUSH

Yesterday , while I was out and about, I stopped by at Priceline to see if they had a particular product that I was looking for. They didn't yet have the thing that I eventually came home and bought from their online store, but they did have a little stand of Models Prefer sets that were reduced in price, and I managed to pick up some bargains!
 One of those bargains was this amazing little blush set, called Beauty to go cream and compact blush, which contains two similarly toned blushes, one in cream form, and the other a powder!
The one that I got is a lovely peach-toned set, and I can really see myself using them to death.

 The cream blush is called Tickled Pink, it's very smooth and luxurious-feeling, and blends out beautifully. The pigment is strong, so building it up from a very light touch would be the way to go with it, I think, unless you're a fan of the scarlet fever look.
The powder is called Desk to Date, and I can see how just a light brush of this on your cheeks would be the perfect daytime look, with the option to amp it up a little later for a glam night time "date" look.
The swatches here on my arm are Cream blush in Tickled Pink at the top and Compact blush in Desk to Date at the bottom.
These little sets are well worth a look. Models Prefer is exclusive to Priceline and Priceline Pharmacy, and is available nation-wide.
Tuesday, 8 October 2013
MAKEUP SKILLZ: MAKE YOUR LIPSTICK LAST

Usually, I'll combine a liner, a lipstick and a gloss to achieve this. Usually, I only have to carry the gloss for touch-ups and that keeps me going all day. Here, I've chosen asap mineral lip pencil, ChiChi viva la diva lipstick, and Revlon lip butter.
Step 1: Liner. Use the pencil to line your lips, then colour in your entire lips with the pencil to get a really good covering of colour as a base. This will have a better overall look if your lips are well taken care of.
Step 2: Lipstick. Apply a generous coat of your lipstick, making sure you don't get it all over your teeth and that you've covered the entire lip.
Step 3: Blot. Using a tissue, clamp your lips down to blot away some of the lipstick colour. This will allow your lipstick to dry a little bit more and the colour will adhere better to the lip liner.
Step 4: Gloss. Apply a slick of lip gloss over the top as a finishing coat. If you like a more matte look, you can use another coat of lipstick instead.
And that's it. That's all I do. To me, that seems like a lot of mucking around, but I suppose it only takes a few minutes to make sure you get a really long lasting colour. Obviously it helps if you're using a long wear lipstick, too.
Sunday, 6 October 2013
REVLON NEARLY NAKED MAKEUP - REVIEW

Hear what I have to say about my first impressions of these products in my video below.
The foundation is available in 12 shades, the powder is available in 6 shades, and there's something for every skin tone. Very impressive light to medium coverage products that let your natural awesomeness shine through, whilst providing coverage where you need it.
Pick it up today, available at most cosmetic outlets and pharmacies.
Fair and full disclosure: I was provided with these products free of charge for my consideration. I was under no obligation to review these products and always endeavour to bring you open, honest reviews of products I have used and genuinely enjoyed.
Friday, 27 September 2013
BELLABOX SEPTEMBER 2013 REVIEW

 This month, my Bellabox was so huge, it didn't even come in a box! 8 products (including the Cleo Magazine), and 7 of them are full size! With a massive $85 value for an outlay of $14.95, everyone should be more than happy with Bellabox this month, despite the delay, which was due to the Cleo magazine release date. My two favourite items in the box are the asap lip pencil, and the elegant touch nail wraps.

Cleo sponsored the box this month and decided on what should go into the box, a treat for us all, including everyday items most women need/want. I think they got it right. Check out my unboxing video for more!
Thursday, 26 September 2013
LUST HAVE IT, SEPTEMBER 2013 - REVIEW

With only 2 of the products giving this box a value of $54, and then a massive 7 "filler" items, 4 of which are very good sized samples, I'm really impressed by the box.
 Baji are aussie, friendly to all the creatures, and keep all the good stuff in their products by not using big chemicals to make it look and smell pretty, and their full sized Rescue Eye serum is my big ticket item in this box at $39. Along with that, I'm really excited about the Lust Have It synthetic precision pencil brush, which will be an awesome addition to my ever-expanding brush collection. I love my Lust Have It Kabuki, and I use it every single day.
Check out my unboxing video to see the rest of the items, including a brand I haven't seen in a long time, and I'm really happy to see in the box!
Fair and full disclosure: I was sent this box free of charge by Lust Have It for my consideration, and was under no obligation to review it. I always endeavour to bring you open and honest reviews, stating my own opinions.
Wednesday, 25 September 2013
MAKEUP SKILLZ: EYESHADOW BLENDING AND CONTOURING

First, let's talk about blending. The trick to blending properly is having the correct tool for the job. I use Real Techniques eye brushes. The shader brush is perfect for applying the colour, then their deluxe crease brush is perfect for all those blending jobs. I got mine at Walmart and they are really, really affordable.

Using a flat shader brush, be sure to pat the colour onto the lid, instead of sweeping it across the eyelid, to get the best colour payoff from your eyeshadow. We'll go into what kinds of colours to use where in the contouring section later.
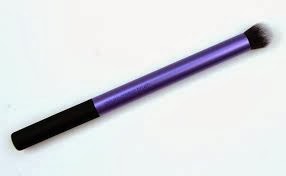 The most important thing I can tell you about blending is to ALWAYS USE A CLEAN BRUSH TO BLEND WITH. I like to keep a makeup wipe on my counter top to clean my blending brush with as I go.
Blend in small, circular motions, taking care to work on top of your shadow, and not into it. Don't press down hard, as the eye area is very delicate, and also the crease/blending brush is designed for just the tips of the fibres to be used to gently blend the eyeshadow together.The finished look should be seamless, with no harsh lines of colour anywhere. The more you blend, the smoother the look, and depending how you want your makeup to end up looking will dictate how much time you need to spend on blending it out. You can always go back in with more colour to even out your look as you blend.

Eye contouring is a really great way to create gorgeous eyeshadow looks that really pop, and the basic eye contour has become a staple of makeup culture today.
We start with the lightest colour we're going to use, highlighting under the brow bone, to give depth to the eyes, and into the inner corner, to make the eyes look slightly larger and set wider apart (if you have large, wide-set eyes, this step will be one you'll like to skip). Next, the main colour you would like to feature in the look goes in the middle of the eyelid. You can see a really great example of this in the purple look here. I also like to use this colour, or a slightly lighter tone, up into and above the crease, blending it into the brow highlight as a "transition" colour.
 Last of all, for a simple look with eye contouring, use the darkest colour you're going to use, forming a triangular shape into the outer corner of the eye, and sweeping it up and into the crease, once again to add depth to the eyes and make them pop a little more.
Once you're done with the upper lid, depending on your look, you can also use an eyeliner brush (I prefer to use an angled push liner brush for more precise placement) to place some of your eyeshadow colour along the lower lashline. This is particularly nice if you're going for a nice smoked-out look.
Apply eyeliner and mascara as you wish, and your eyeshadow look is done!
A couple more tips now, to deal with fallout (powder falling from the brush as you use it, onto your cheeks).
If you're using really powdery shadows that do fallout a lot, start with your eye makeup, then do a cleanup with makeup wipes and apply the rest of your face. This isn't hard to do, and once you've tried it a couple of times, you'll find it easy.
Alternately, if we're just dealing with a tiny bit of fallout, use a large, soft brush to gently brush the powder away, being careful not to streak it all over your face. If you do happen to make a mess of it, you can always use makeup remover wipes to clean up and simply reapply makeup over the area.
Practice, practice, practice! It's only makeup! It washes off. If you mess it up you can try again. That's one of my best things about makeup, and why I love it so much. You can do anything you want to do, create anything you want to create, and at the end of the day, the canvas is clean to start again!
Monday, 23 September 2013
VIOLET BOX SEPTEMBER 2013 REVIEW

There is $42 of value in the box, so I did technically get more than my money's worth, but it feels like a box full of fillers. There's no standout product in a box that is usually full of standout products. Stay tuned over the next month and see if they pick up their game, or if Violet Box ran out of steam in their first 3 boxes.
Watch my unboxing video below for more details about exactly what's in here, as well as a massive WTF moment when advertising material from an unrelated brand had me totally confused.
Wednesday, 11 September 2013
LUST HAVE IT AUGUST 2013 - sorry it's late

The review is out a little late because my mail was held while I was away, but as soon as I got it all sorted and had a chance to look over the contents, I filmed an unboxing so that you guys can have a look at what I got.
Lust have it have also given me a unique code that you can use to get $5 off your first Lust Have It box. Use the code KATY at check out when you subscribe and get that discount automatically!
Here's the video:
Tuesday, 10 September 2013
HAUL: WHAT I BOUGHT IN THE USA

I didn't go too crazy on makeup while I was in Texas, but I did spend a couple of hundred dollars, which is unheard of for me, especially since I've been blogging. Here's a video of all the goodies I picked up, along with some shocking price comparisons on really super-trending items.
Saturday, 31 August 2013
Katy's beauty secrets is celebrating it's first birthday! You get the gifts!

I can't thank you all enough for making my first year of blogging so amazing and enjoyable. I know that my numbers are relatively small, compared to a lot of other blogs, but right now, this is a great size for me. It feels like I have a little community happening, and I am grateful for every single one of you.
Now, I would absolutely LOVE to give all of you an individual gift to celebrate my blog's birthday, but unfortunately, that would be a logistical nightmare. What I can do, with the help of some really awesome brands, is celebrate by doing some giveaways that will allow a few of you to win some really great prizes! Stay tuned tomorrow for the first giveaway of 3 (or more) that will be happening over the next month. Details in the giveaway posts.
I would like to send out my warmest and most heartfelt thanks to Sukin Organics and John Frieda Hair care, who have sponsored this celebration by providing products for the giveaways. Without the cooperation and support of beauty brands like these guys, my blog wouldn't be half as awesome as it is. I have to acknowledge all of the wonderful PR reps who I've built a wonderful working relationship with over the last year. It really has been a pleasure.
 So once again, thank you all so much, and here's to many, many more birthday celebrations!

Wednesday, 28 August 2013
REVIEW: John Frieda Precision Foam Hair Colour.


 The awesome people at John Frieda sent me some of their new hair colours to try out, and it really is a new and different way to apply hair colour at home. I'll go through the process in a sec, but first I want to talk about what you get inside the box. There's the colour, the developer, a weird nozzle for the bottle, instructions, gloves and after-colour conditioner. Let's just take a second to talk about the gloves. They are actually really awesome gloves, not the crappy, noisy plastic type that never fit on your hands properly. These are like the kind of gloves my hairdresser in the salon wears. I really appreciate the little extras in a product like this, and for the extra little bit of cost in the product, they make life a lot easier.

So you mix the colour with the developer, and it ends up completely liquid, and with what looks like not much product in the bottle. The instructions then say to squeeze the middle of the bottle and dispense product into your hand and here is what happened:
 FOAM! I don't know what I was expecting, considering it says FOAM right there on the box, the bottle and the ads on TV. Still, I was thoroughly impressed by the foam. Here's the upside of using the foam on your head; there is a lot more product in the pack. If you have long hair and usually need 2 colour packs, I would try this one. There was too much product for my fine shoulder length hair, and I didn't use about a third of it. Also, the mess... if you're usually a bit messy with your hair colour, this is the product for you.It wipes off of skin (and benchtops) so easily, and it's just generally easier to apply neatly and without making a massive mess of yourself. I've seen girls wandering around, thinking they look great (even beauty bloggers at events have been guilty of this!), with dye stains on their ears and in their hairline, which is NOT a good look. This foam colour seems to reduce that. In fact, I had not one bit of colour on any of my skin, clothes or bathroom when I was done, which is quite a feat.
So now for the important part. The results. What I was going for was "proper ginger", and I chose 6.5C, Lightest copper brown. I think I'll let the "After" picture speak for itself. I'm absolutely delighted with it!
I will definitely be going back to this colour for the forseeable future, because it's exactly the colour I wanted, easy application, great results, and the after-colour conditioner is just beautiful on the hair. I adore this product, and I highly recommend it to everyone who colours their hair at home.
You can find it for yourself at Chemist Warehouse, Priceline, Woolworths, Coles, Target and selected pharmacies.
Fair and full disclosure: John Frieda sent me this product free of charge for my consideration. I was under no obligation to review it. I endeavour to bring you honest reviews of products that I have personally tried and loved. Did I mention that I really love this hair colour?
Subscribe to:
Posts (Atom)